
The control starts up in Incremental jog mode. In order to jog the axes in continuous movement, you need to press the INCR/CONT key to switch from incremental to continuous jog mode.
The Machine Home position is fully X- (bridge to left), Y- (carriage to front), Z+ (head up) and C to center (zero degrees).
|
The control starts up in Incremental jog mode. In order to jog the axes in continuous movement, you need to press the INCR/CONT key to switch from incremental to continuous jog mode. |
You can control the feed reel and takeup reel manually with jog panel keys, or automatically with program codes.
During setup and tape loading, you can control operation with these keys:
 |
Jog feed reel forward (leaving takeup reel free) |
 |
Jog reels forward (from feed reel to takeup reel) |
 |
Jog reels reverse (from takeup reel to feed reel) |
In Auto mode, you can control operation with these codes:
| M80 | Enable laydown mode |
| M81 | Cancel laydown mode |
| #16 = nn.n M82 |
Do rollback, specified number of inches |
| #16 = nn.n M83 |
Do roll forward, specified number of inches |
In laydown mode, the reels apply constant tension to the tape, with a slight bias in the forward direction (towards the takeup reel).
Laydown mode should only be activated (M80) once the tape is in contact with the mold surface. Laydown mode should be cancelled (M81) before lifting off the mold surface.
The rollback operation (M82) is intended to bring the leading point of a diagonal cutoff back under the compactor (or roller), in preparation for starting the next course.
Prior to calling M82, the CNC program should set the desired rollback distance (in inches, as a positive value) in CNC variable #16.
The chute heater system can be operated with automatic M functions, as follows:
| #16 = nn M70 | Center Heater On, to specified temperature (°F) |
| M71 | Center Heater Off |
| #16 = nn M72 | Edge Heater On, to specified temperature (°F) |
| M73 | Edge Heater Off |
The C axis is programmed in degrees of rotation. While laying tape, the CNC program must call out the correct angle on the C axis to keep the tape head aligned with the course.
C axis travel is limited to ±190°. If the machine is laying tape at +135°, and the next course requires -135°, then the head must rotate the long way around (270° minus, instead of 90° plus).
In normal operation, the Auxiliary keys on the jog panel have the following functions:
|
Jog feed reel forward | |
Jog tape reels forward | |
Jog tape reels backward |
 |
No function |  |
Force lube cycle * |  |
No function |
 |
Work lights on/off |  |
Jog V axis minus (left) |  |
Jog V axis plus (right) |
| Aux10 | No function | Aux11 | Jog B axis minus (CCW) | Aux12 | Jog B axis plus (CW) |
| Aux13 | Special functions * | Aux14 | Maintenance Mode On/Off |
* To force a lube cycle, press the Aux5 key while holding the Aux13 key.
| M0 | Stop (wait for Cycle Start) |
| M1 | Optional Stop (wait for Cycle Start) |
| M2 | Program Restart (with wait for Cycle Start) |
| M26 | Set Axis Home (only used in machine homing macro) |
| M51 | Update bladder pressure in P951 |
| M52 | Update compactor pressure in P952 |
| M55 | Update roller pressure in P953 |
| M56 | Mold alignment laser on |
| M57 | Mold alignment laser off |
| M60 | Advance Cutter Blade Carrier |
| M61 | Retract Cutter Blade Carrier |
| M62 | Advance Roller |
| M63 | Retract Roller |
| M64 | Advance Compactor |
| M65 | Retract Compactor |
| M66 | Advance HSB |
| M67 | Retract HSB |
| M68 | Advance Z3 Null Pin |
| M69 | Retract Z3 Null Pin |
| M70 | Center Chute Heater On |
| M71 | Center Chute Heater Off |
| M72 | Edge Chute Heater On |
| M73 | Edge Chute Heater Off |
| M78 | Extend Z3 LVDT Pop Pin Down |
| M79 | Retract Z3 LVDT Pop Pin Up |
| M80 | Feed reel and takeup reel laydown mode on (apply torque) |
| M81 | Feed reel and takeup reel laydown mode off (release torque, free motors) |
| M82 | Feed reel and takeup reel rollback mode |
| M83 | Feed reel and takeup reel roll forward mode |
| M84 | Turn tape feed monitoring mode on |
| M86 | Lower head a short distance (touch down on part) |
| M87 | Raise head a short distance (lift off of part) |
| M85 | Turn tape feed monitoring mode off |
| M91 | Home axis in minus direction (only used in machine homing macro) |
| M92 | Home axis in plus direction (only used in machine homing macro) |
M functions M93 and above are used internally in custom macro programs, but are generally not used directly in user machining programs.
See Chapter 13 of the Centroid M-Series Operator's Manual for descriptions of the higher-numbered M functions.
The following parameters on the Centroid Machine Parameters table are used for features specific to this machine.
| P179 | Lube cycle interval in minutes, x100 | 6000 = 60 minutes | Minutes of program cycle time (including MDI) before starting a lube cycle |
| P941 | Lube cycle maximum stroke count | 1-999 | If a lube cycle does not complete within this number of pump strokes, the PLC will trigger a Fault |
| P951 | Bladder pressure setting | 0-15 | Values 0-15 set pressures ranging from 5-38 PSI |
| P952 | Compactor pressure setting | 0-15 | Values 0-15 set pressures ranging from 9-136 PSI |
| P953 | Roller pressure setting | 0-15 | Values 0-15 set pressures ranging from 2-95 PSI |
| P954 | Center chute heater output setting | 0-65535 | Values 0-65535 set temperatures ranging from 0 to 1264°F (set by M70 macro) |
| P954 | Center chute heater output setting | 0-65535 | Values 0-65535 set temperatures ranging from 0 to 1264°F (set by M72 macro) |
| P961 | Jog speed setting for Z2 axis | 0-32767 | Value is added to or subtracted from 32768 to get DAC output to servo drive (velocity reference, zero to maximum) |
| P962 | Tape distance for M82 rollback and M83 roll-forward cycles | Distance (inches) | (set by M82 and M83 macros) |
| P963 | Feed reel (UF) velocity command in forward jogging and roll-forward | ±32767 | Value is added to 32768 to get DAC output to servo drive (velocity reference, maximum reverse to maximum forward) |
| P964 | Takeup reel (UT) torque command in forward jogging and roll-forward | ±32767 | Value is added to 32768 to get DAC output to servo drive (torque reference, maximum reverse to maximum forward) |
| P965 | Feed reel (UF) velocity command in reverse jogging and rollback | ±32767 | Value is added to 32768 to get DAC output to servo drive (velocity reference, maximum reverse to maximum forward) |
| P966 | Takeup reel (UT) torque command in reverse jogging and rollback | ±32767 | Value is added to 32768 to get DAC output to servo drive (torque reference, maximum reverse to maximum forward) |
| P967 | Feed reel (UF) torque command in laydown mode | ±32767 | Value is added to 32768 to get DAC output to servo drive (torque reference, maximum reverse to maximum forward) |
| P968 | Takeup reel (UT) torque command in laydown mode | ±32767 | Value is added to 32768 to get DAC output to servo drive (torque reference, maximum reverse to maximum forward) |
| P970 | Linear slope value for center chute heater temperature feedback calibration | ca. 15.0 | Used to match 12-bit ADC feedback to 16-bit DAC request in P954 |
| P971 | Linear intercept value for center chute heater temperature feedback calibration | ca. 1200 | |
| P972 | Linear slope value for edge chute heater temperature feedback calibration | ca. 15.0 | Used to match 12-bit ADC feedback to 16-bit DAC request in P955 |
| P973 | Linear intercept value for edge chute heater temperature feedback calibration | ca. 1200 | |
| P974 | Up-to-temperature tolerance for chute heaters | ca. 500 | Same scale as P954 & P955 |
| P980 | Z movement distance for M86 and M87 | Distance (inches) |
For all other Machine Parameter functions, see Chapter 14 of the Centroid M-Series Operator's Manual.
The PLC program can generate several fault, error and warning messages, in addition to those listed in the Centroid operator's manual.
You can use the PLC Diagnostic display on the console to view some of the Centroid PLC input and memory locations mentioned with these fault and error conditions. At the control's main screen, press Alt-I to activate the PLC Diagnostic display. Press Alt-I again to dismiss it.
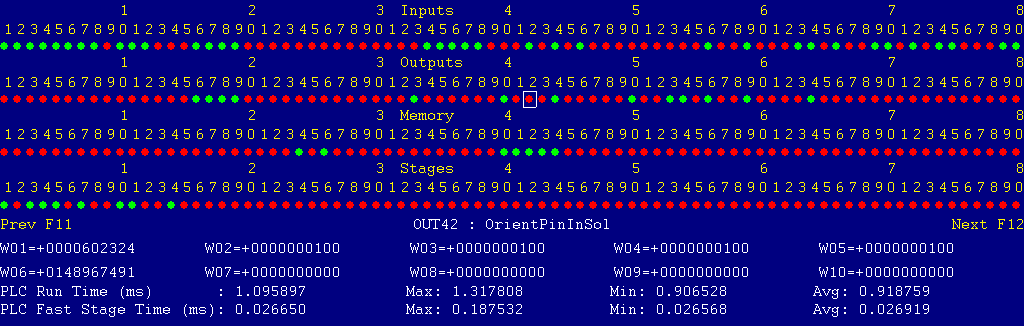
Each page of the Diagnostic display shows four rows of red and green dots: the first row shows PLC inputs 1 through 80; the second row PLC outputs 1 through 80; the third row PLC memory bits 1 through 80; and the fourth row PLC program stages 1 through 80.
You can use the arrow keys to move a highlight box over any of these locations. The name of the highlighted location will be displayed in the center of the screen below the red and green dots.
For example, in the illustration above the highlight box is on Output #42: The dot below the 2, to the right of the superscript 4, on the second line.
Below the four rows of bit status information are ten numeric ("word") variable values, labeled W1 through W10. Some of these variables also hold useful status information, described with the error and fault conditions to follow.
There are multiple pages of Diagnostic data. With the Alt-I diagnostic display showing, you can use the F12 and F11 keys to scroll right and left. For example, pressing F12 once will shift to the page showing inputs and outputs 81 through 160, and word variables W11 through W20.
Messages with 9000-series message numbers are Faults. After resolving the problem, you must press and release the Emergency Stop button to clear a Fault.
Messages with 8000-series message numbers are Errors. Errors will cancel the program cycle and stop the spindle and coolant, but they do not then need to be explicitly reset.
Messages with 5000-series and 2000-series message numbers are Warnings and Informational Messages. They do not cancel the cycle or require any action to reset.
The control detected an internal error in processing the PLC logic program.
Report this error to your dealer, along with the values from W14 and W15. Also report what function the machine was performing when the fault occurred.
You must shut down and cycle the power to clear this fault.
References:
PLC W14: Copy of internal SV_PLC_FAULT_STATUS, indicating the type of problem
PLC W15: Copy of internal SV_PLC_FAULT_ADDRESS, indicating the location of the problem
The control unit detected loss of communication from the operator panel in the Console.
Check for damage or disturbance to the cable between the console and the Oak control unit in the control cabinet.
Press and release Emergency Stop to clear the fault.
References:
Schematic: Lines 93, 106
The operator panel reported back to the control unit a loss of communication from the control unit. This indicates the return signal from the pendant is functioning normally, but the outgoing signal may have problems.
Check for damage or disturbance to the cable between the console and the Oak control unit in the control cabinet.
Press and release Emergency Stop to clear the fault.
References:
Schematic: Lines 93, 106
You exited the CNCM control software without first pressing Emergency Stop.
Always press Emergency Stop prior to exiting the control software.
Press and release Emergency Stop to clear the fault.
One of the safety bumpers surrounding the head was bumped.
Verify that the bumpers are clear, then press and release Emergency Stop to clear the fault.
References:
PLC INP__: indicates monitoring relay (4CR) state.  Green = closed = okay, Red = open = tripped
Schematic: Lines __
One of the rope-pull emergency stops, on the supporting frame, was pressed.
Reset the auxiliary emergency stop switch, then press and release the console Emergency Stop button to clear the fault.
References:
PLC INP__: indicates safety relay (1SR) state.  Green = closed = okay, Red = open = tripped
PLC INP__: indicates console emergency (PB1) state.  Green = closed = okay, Red = open = tripped
Schematic: Lines 132, 147, 150
The control lost communication with one or more of the PLC I/O expansion boards.
Power down, open the cabinet, and check the connections at both ends of the gray cables which connects H8 - H11 on the Oak unit to H3 on the three PLCADD1616 boards, and to H2 on the ADD4AD4DA board.
Power up and check for green "PLC OK" LED indications on each of the expansion boards.
References:
PLC W36: bitmap of detected PLC expansion boards.  15 = four boards detected
Machine Parameter 900: bitmap of expected PLC expansion boards.  15 = four boards expected
Schematic: Lines 108, 155, 169, 180
The PLC program requested display of a message on the screen, but the provided message code was not valid.
This indicates an error in the PLC program. Report the message to your dealer, along with the value in PLC variable W16.
References:
PLC W__: stores the invalid message code
The PLC hardware detected the presence of an I/O expansion board, but the setting of Machine Parameter 900 did not tell it to expect that board in the system.
On this machine, there should be four I/O expansion boards installed, and Machine Parameter 900 should be set to 15.0.
References:
PLC W36: bitmap of detected PLC expansion boards.  15 = four boards detected
Machine Parameter 900: bitmap of expected PLC expansion boards.  15 = four boards expected
A previous servo drive fault condition has been resolved, and cleared with Emergency Stop.
A previous PLC fault condition has been resolved, and cleared with Emergency Stop.
You inadvertently pressed a keyboard combination that is used for keyboard jogging controls, but keyboard jogging features have been disabled on this machine.
A previous fault condition has been cleared with Emergency Stop.
The order of the axis drives; order of the axis definitions in the control configuration menus; and order of the axis jogging controls vary. Definitions are as follows:
| Axis | Axis # | Drive # | Drive-Okay Bit | Jog Keys | MPG Position |
|---|---|---|---|---|---|
| X | 1 | 1 | MEM1 | X | 1 (X) |
| Y | 2 | 3 | MEM2 | Y | 2 (Y) |
| Z | 3 | 4 | MEM3 | Z | 3 (Z) |
| U | 4 | 2 | MEM4 | (none) | (none) |
| C | 5 | 5 | MEM5 | 4th | 4 |
| V | 6 | 6 | MEM6 | Aux8/Aux9 | 5 |
| B | 7 | 7 | MEM7 | Aux11/Aux12 | 6 |